Travel Photography Tip - Frankieboy Photo breaks down the popular Sunstar trick
Travel Photography Tip -
Frankieboy Photography breaks down the popular Sunstar trick

QUEENSTOWN NEW ZEALAND SUNSET // PHOTO BY FRANKIEBOYPHOTOGRAPHY.COM
Hello! Frankieboy photography back with another edition of travel photo tips - this time we will discuss sun stars and when to use this styled out lens flare trick. I love sun stars and I probably overuse them but once you get this technique down you'll love them too and you'll continue to chase shots that contain elements like this image below - the sun rising over Mt. Agung Volcano, north of Ubud, Indonesia:
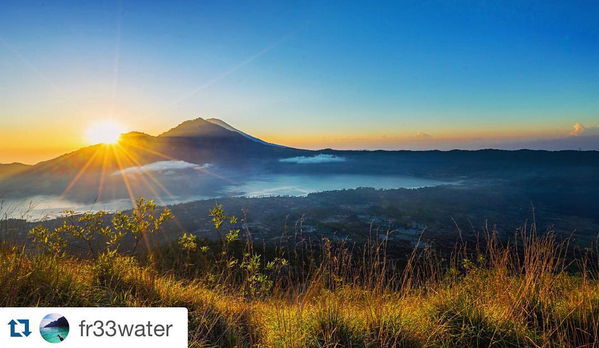
SUNRISE OVER MT. AGUNG VOLCANO // IMAGE BY FRANKIEBOYPHOTOGRAPHY.COM
There are a number of techniques to capture these stars from the sunlight - you can even catch these with your iPhone if your a super skilled phone photographer. Here are some tips to keep in mind when after a stunning sun star shot:

IMAGE TAKEN ON ROKINON 14MM X SONY A7 // CAN YOU TELL THE QUALITY DIFFERENCE?
-Use top notch glass (by this I mean expansive lenses will create even louder/sharper sun stars, I shoot most of my sun star images with my Sony Zeiss 16-35mm - I have captured them on my Rokinon Wide 14mm in the past seen above on this HDR image of the Aspen tree)
-Tripod, tripod, tripod! Stability is also key when shooting images like these - crank your camera down to a nice sturdy tripod and then angle up your shot - the sharper the image, with less shake the sharper that sun star will be (also use a 2 second timer so you don't bump or move the camera at all)

CATLINS NEAR CURIO BAY, NEW ZEALAND // IMAGE BY FRANKIEBOYPHOTOGRAPHY.COM
-Dial your F-Stop to between F16 and F22 (although your histogram might be saying no this is what it takes to make those sun rays)
-I usually keep my camera set to Av mode or Aperture Priority mode - let the camera help you with the shutter speed while you dial in the correct F-Stop
-Hide the sun behind an object or catch a setting sun or sunrise (if you find yourself shooting during the brightest part of the day - get down low and partially hide the sun behind an interesting element: tree, waterfall, bridge)
-Don't overuse this fun, creative technique (I can admit I love to make sun stars but at times I think I over do it - so save these captures for really special moments to add that wow factor to any sunset or rise... You can still make great image without sun stars so keep that in mind)

IMAGE BY FRANKIEBOYPHOTOGRAPHY.COM // FOR USE BY MEETYOUTHERE
In summary a combination of good quality lens, wide angle, F16-22, and half hiding the sun behind an object should set you up for some powerful sun star shots. A nice tip to practice for how to half-hide the sun: stand under a tree where the sun is shining thru and with your eye peek thru the branches where you barely see the sun poking thru once you find that hot spot bring your camera to your eye and find the same spot with the view finder. Well I hope this lesson on sun stars will help guide you to making some really awesome shots - now get out there and try it on tonight's sunset! ~Frankieboy Photography
Check out all the images on my site: Frankieboy Photography
Also follow us on IG to stay up with our latest adventures and images: @meet_youthere